|
|
|
|
|
Mon - Fri 9:00AM - 12:00PM; 1:00PM - 5:30PM (GMT+7) |
We are here for you.
|
|
|
|
|
Mon - Fri 9:00AM - 12:00PM; 1:00PM - 5:30PM (GMT+7) |
Microsoft has ended support for Windows 7 since January 14, 2020.
After this date, your PCs that run Windows 7 is vulnerable to security risks.
If you are about to upgrade to Windows 11, you need to upgrade the BookDrive software as well.
We have a special upgrade offer for you.
Each purchase of BookDrive comes with Capture and Editor software, and 1-year right of upgrade.
For example, if you buy a BookDrive in 2015, you can download any software updates from us between 2015-2016. For newer software than that, you have to buy the upgrade from our online store.
The current software (BookDrive Capture and BookDrive Editor Pro) is available for download for Atiz customers who have purchased from within the past 12 months. Please find the links to each product on the right column.
Please register with us first before download. https://www.atiz.com/register/serial/
What about the old software?
Every old BookDrive comes with a CD that contains the software available at time of purchase. Any version of software is also available for download up to a year. Longer than that, we may no longer host it.
You can always use the dongle that you have to run the software that comes in the CD. But if you lost the CD, and you have purchased from us over a year ago, you may have to buy the upgrade from our online store.
You are eligible to buy an Upgrade if your BookDrive is within 4 years from time of purchase.
After 4 years, it will require a New License.
BookDrive Capture and BookDrive Editor Pro from year 2012 onwards does not require any activation or any registration code/activation code involved.
If your software requires an activation, that means your unit is probably from older than 7 years (earlier than 2012). That version has been discontinued since 2014. Unfortunately, we no longer support it.
Old software version before 2012 is not available to download or re-activate.
The software would still continue to work as long as you maintain the computer and keep it running.
If your PC dies or you need to reinstall that version of software on another PC, we would not be able to support it. The underlying system required for activation and re-activation has been decommissioned. You will need to update to a more current version which is available from our online store (www.atiz.com/store)
 One Shot
  Center-weight metering
  Large
Large  Custom white balance
Specific settings for BookDrive Mark 2
F stop: F6.3 Shutter speed: 1/80 sec
Specific settings for BookDrive Mark 2 Lite
F stop: F5 Shutter speed: 1/50 sec
Specific settings for BookDrive Pro
F stop: F5 Shutter speed: 1/50 sec
Specific settings for BookDrive Mini, Mini 2
F stop: F4.5 Shutter speed: 1/50 sec
Specific settings for BookDrive N
F stop: F4.5 Shutter speed: 1/50 sec
For projects that need color accuracy (tech speak would be low Delta E), we recommend you use Faithful Picture Style.
For projects that want the most sharpness and color accuracy is not first priority, we recommend you use Standard Picture Style.
Basic Tip
Make sure both cameras use "Custom White Balance"
Then on each camera, follow the steps in this video to set a custom white balance.
www.youtube.com/watch?v=bq3yzTPb1Ng
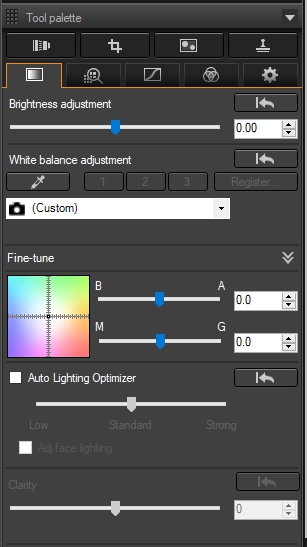
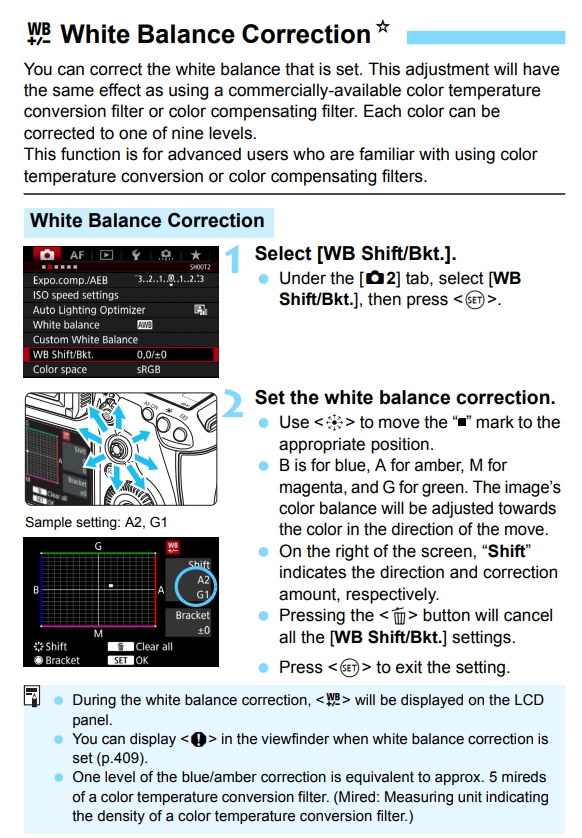
Advanced Tip
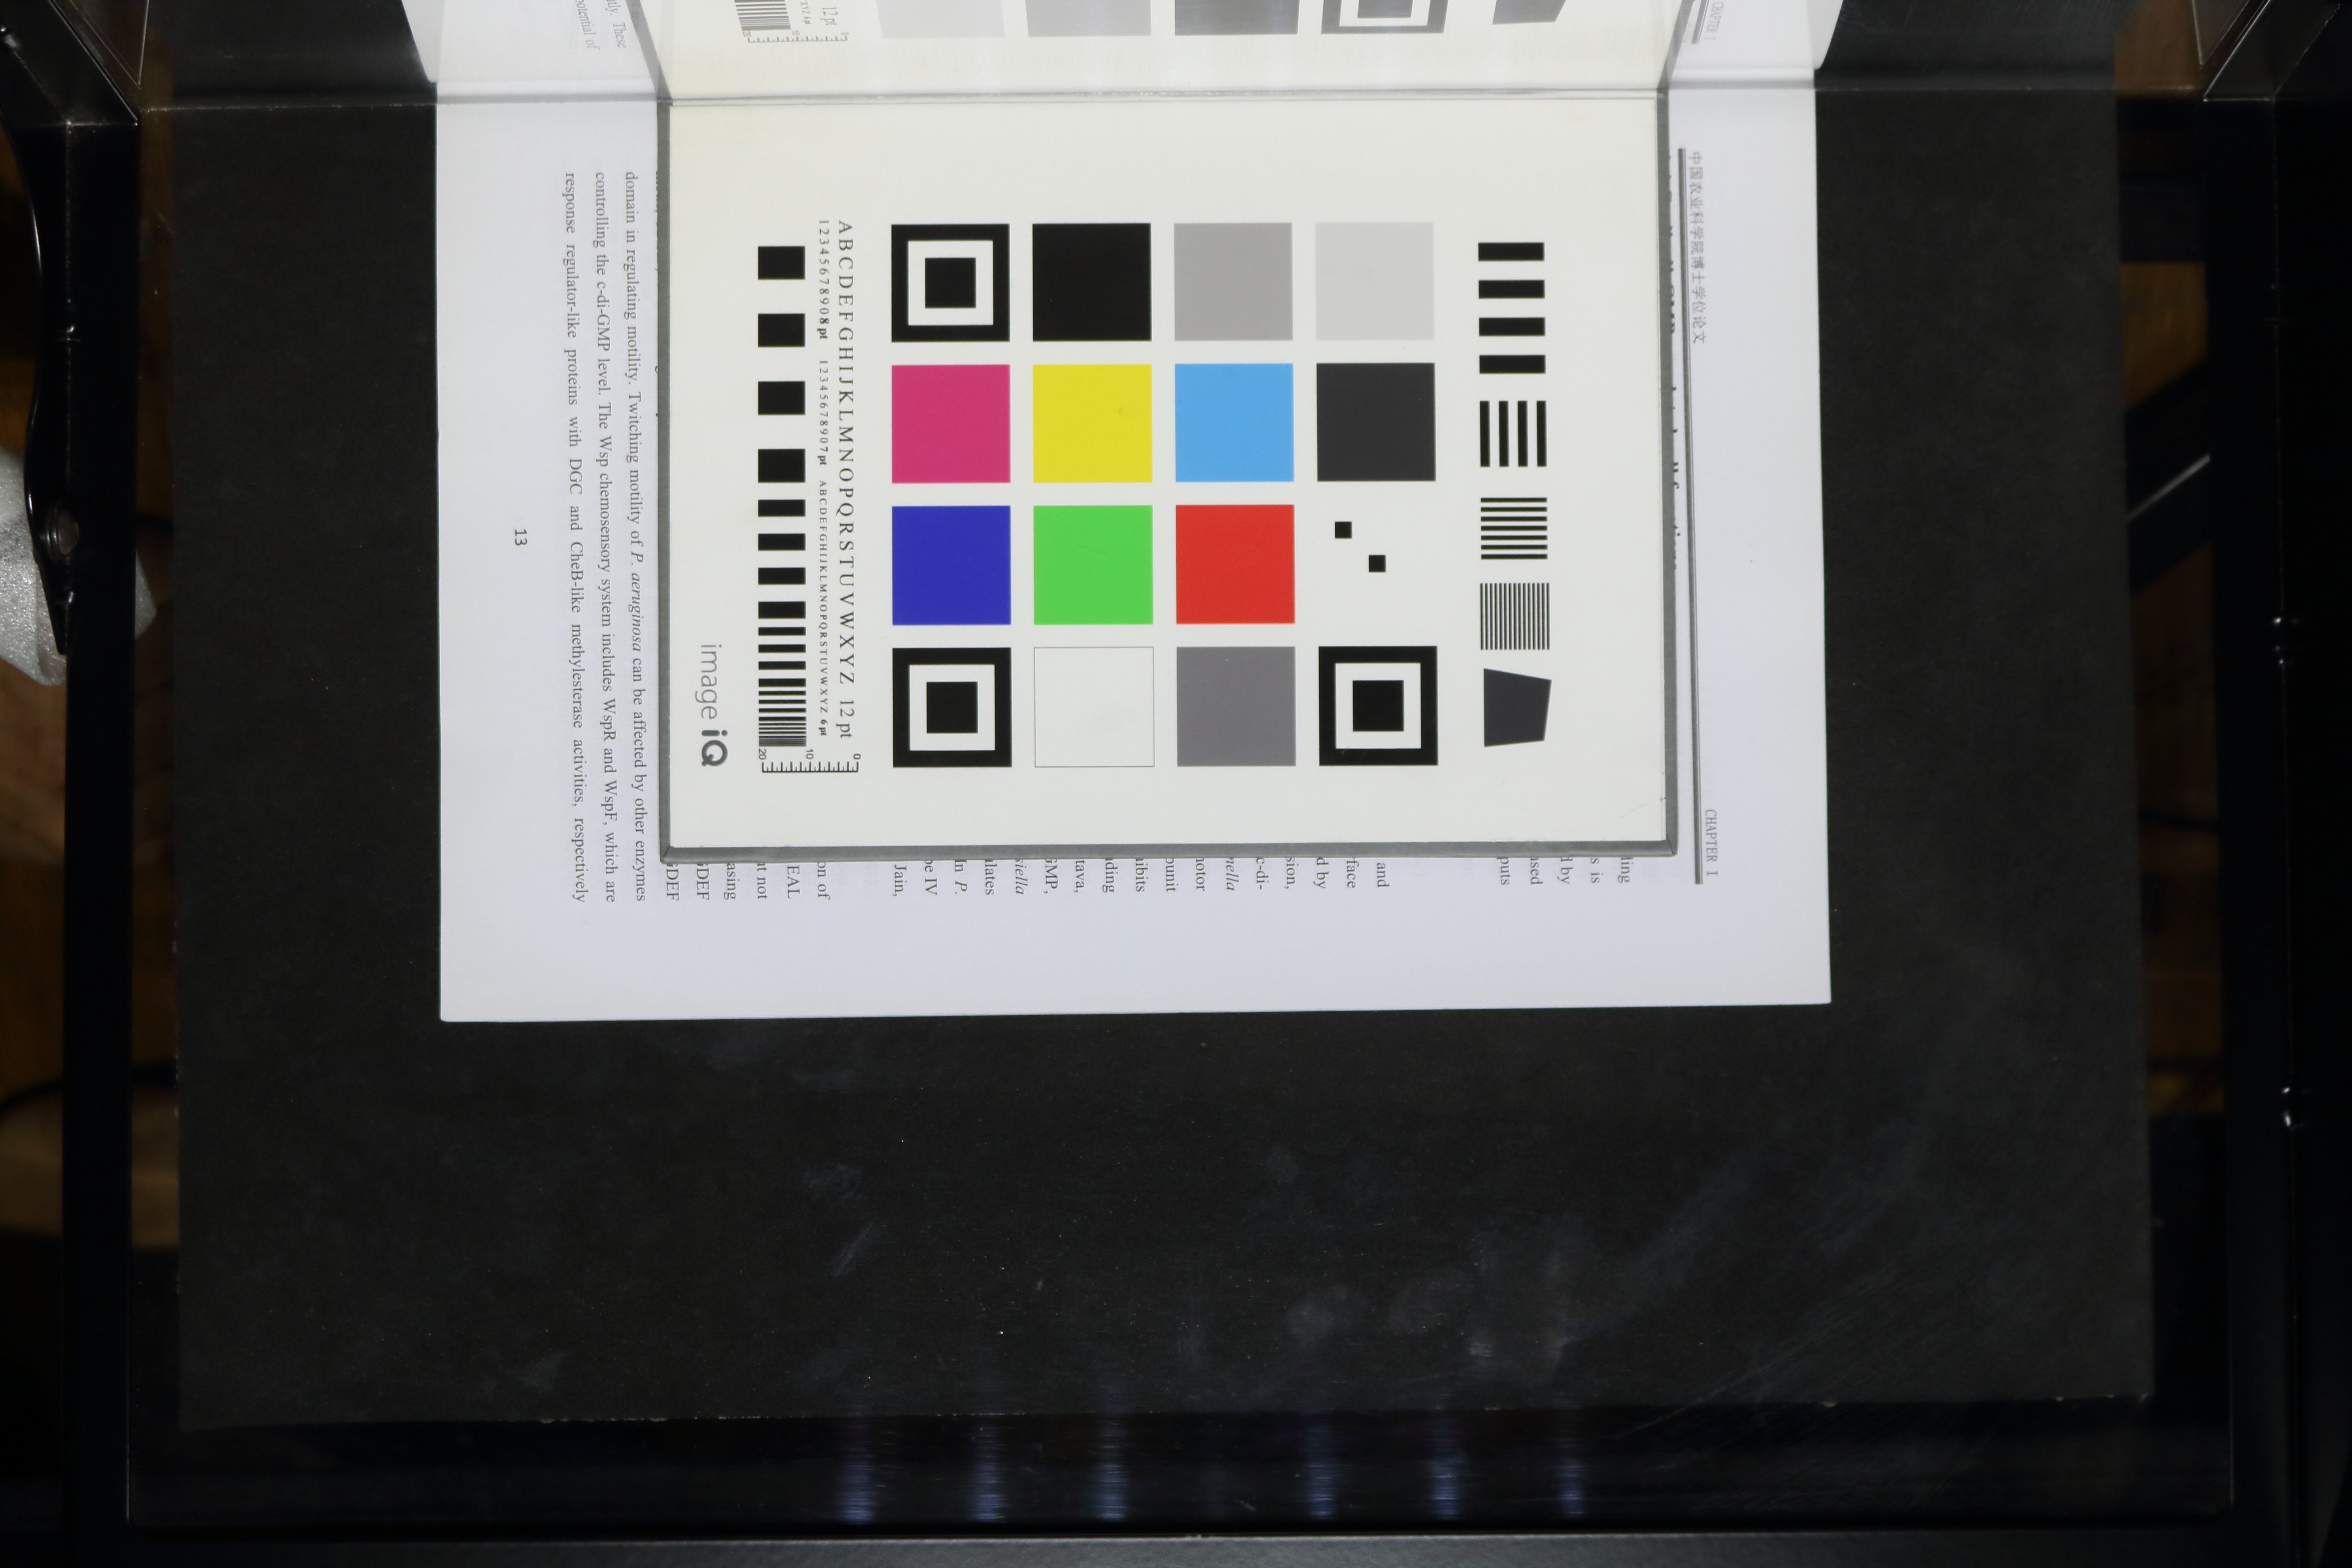
White Balance Correction (need standard white chart eg. X-Rite ColorChecker M50101)
After making custom white balance in Basic tip (required standard white chart for custom white balance), then make the camera white balance correction by following these steps:

Use Manual Focus
In the past, we have recommended customers to use AF (Auto Focus mode), but actually it's better that you scan in MF (Manual Focus mode)
so that the sharpness is consistent on every page, and you don't have to re-shoot an image, or have focus failure when dealing with blank pages.
The depth of field that we normally use (around F5.6) actually give a depth of wield wide enough to cover the varying distance of camera to book.
As long as book thickness (or more precisely the varying of distance between camera and book) doesn't go above the depth of field (the calculation here shows about 3.3 inches), the image should still be in focus and considered sharp from first to last page.
HOW TO
1. We only need to set the proper focus at first. Let's set the camera lens to AF temporarily. AF will help us lock focus properly.
2. Then open the book and turn the pages to somewhere in the middle. (because for the setting we normally used, the depth of field will cover around 3.3 inches. Around 1.6 in front
of subject and 1.7 behind subject.)
Half press the shutter button so you hear the beep of camera, which means it can now lock focus.
3. Switch camera lens back to MF.
4. Now, try shooting the cover page (check the preview if you are happy with the result or not. The magnifying area will greatly facilitate this task).
If the test shot looks good, then you can proceed with scanning the entire book.
As we are relying on MF mode, whether a page to scan is blank or not, no longer affects us.
If the user is meticulous, he may want to re-adjust focus again every 300 pages (as it approaches the edge of depth of field sharpness).
(In our case, a 2000 page-phonebook, we only set focus at first and never readjust, and all the pages still turns out sharp)
5. You may consider putting some kind of scotch tape and stick it to the lens itself to make sure that the lens focus ring not become loose and change the focus by itself gradually during the scanning without us knowing.
Sometimes a lens' focus ring can become loose and move itself a little bit as we lift the glass up and down and there's lots of vibration and impact on the camera. So locking it with the scotch tape is a good practice of ensuring same focus throughout the session.
If the camera appears locked up, in that case, it may require a hard reset. Popping the battery adapter (or the power adapter) out of the camera battery compartment and reinsert it will help.
When the images are blurred or out of focus, almost always it has to with focusing.
1. Make sure the object (i.e. document) fill the screen of the camera and leave the blank black space as little as possible because you want the camera to focus on the document, not on the black cradle underneath it. If there's a lot of black cradle inside the frame and is part of the shot, of course there's a possibility that the camera will look to focus in on the cradle (background) instead of the document (object) that you want to shoot.
2. Use AF mode
3. For AF setting, select "One Shot" setting because that's the most suitable setting for our type of application (shooting stationary object) for "AI servo" was more suitable for shooting moving object and AI focus is the combination of both modes.
4. AF point, select Average.
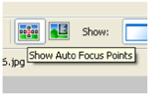
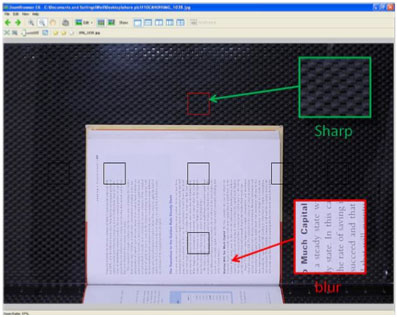
When you capture an image with a Canon DSLR, the information such as shutter speed, focus length and focus point will be added to the image and can be viewed using the Canon also included software named "ZoomBrowser EX", which should be part of what's installed when you install the camera driver.
In ZoomBrowser, simply choose your image and double click. Then click on "Show Auto Focus Points" on the menu.
The red square depicts the focus point of the image taken. It the focus point is on your document, the image should come out fine.
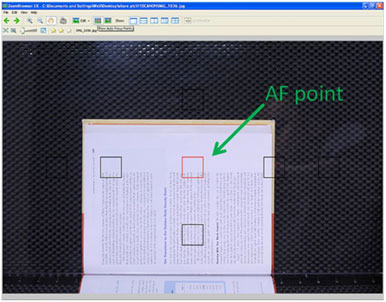
However, you may want to retake the shot if the focus point was on something else (i.e. the black cradle) besides the document.
This issue will not occur if you scan by setting camera lens in MF (Manual Focus) mode. Please see instructions on how to set focus and make images sharp.
We recommend users switch to MF mode.
In the case that you still want to use AF mode, and the camera is unable to focus when shooting a blank page. Here's how to deal with the issue.
If you experience a focus failure, please understand that the computer is not locked up. It just waits for assistance from the user. Once assisted (help the camera to focus) and the camera can shoot that page, user can go with shooting next pages.
Here are 2 simple ways to deal with the issue:
A. Decoy
Create a decoy for focus and then remove it. Here are the steps:
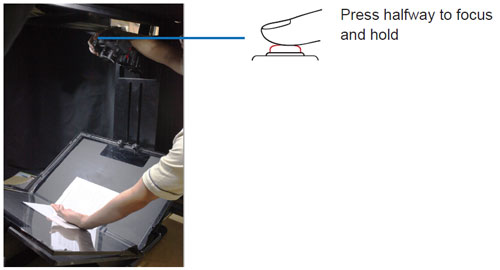
1. Once the camera has focus failure, insert your hand or a sheet of paper into the scene on top of the glass.
2. Press and hold the shutter button halfway. You will hear the sound of the cameras able to focus on the decoy (your hand or paper).
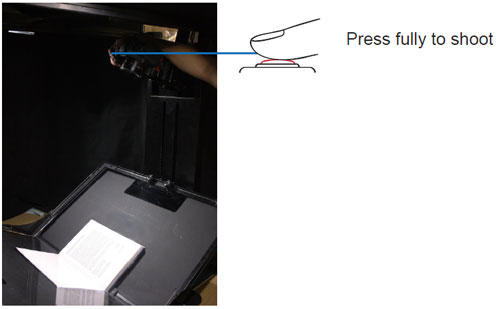
1. The decoy from the scene while still holding the shutter button halfway.
2. Now fully press the shutter button so that the camera captures the blank page.
Once the failed camera was able to take a picture, you can continue scanning next pages.
B. Post it note
The easy solution is to create a small post-it note that says something along the lines of "scanned by ABC Library". Whenever a blank page pops up, just throw this post-it note on top of the glass so that camera can takethe picture.
In the context of scanning, DPI or PPI is the pixel density of an image or specifically "by how many PIXELS PER INCH is my document being recorded?".
To calculate for the DPI (pixel density) of your document being photographed by a camera, divide the number of pixels in length and width by the document length and width in inches.
For example, if you use a Canon 5D Mark II cameras (5616 x 3744 pixels) to scan an A4 paper (11.69" x 8.27") equals:
= 5616 / 11.69 and 3744 / 8.27
= 480.41 and 452.72
So the true DPI of this scanned image is 452 DPI (use the lower number).
Stamped DPI of image
after in an image properties you may see very low DPI eg. 72dpi (picture below)
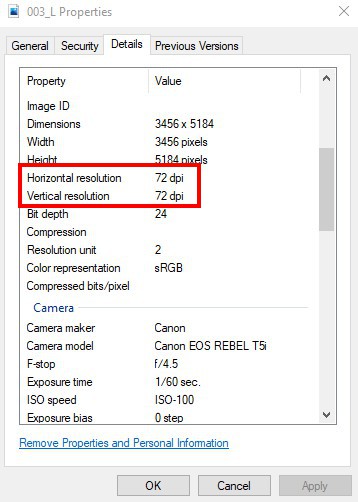
it just the default stamped DPI from the computer NOT the real DPI from machine. You can know the real DPI by calculation
For convenience, you can use our DPI calculator here: www.atiz.com/dpi
Canon EOS 5Ds(r) with
Following these steps:
Precaution
- A power failure during the firmware writing operation may disable the camera.
» Use a fully charged Battery Pack or dedicated AC Adapter Kit (Optional) for the firmware update.
» Do not shut off the power during the firmware writing operation.
» Do not open the card slot cover during the firmware writing operation.
- Do not press any camera buttons during the firmware writing operation.
(1) Prepare the items required to update the firmware.
1. Camera body
2. Dedicated Battery Pack (The battery pack must be fully charged) or dedicated AC Adapter Kit (Optional) ***
3. Memory card (64MB or more, 64GB or less)
4. Firmware update file (you can download it from Canon's Website)
(2) Create the firmware update file.
1. Download the zipped self-extracting file from Canon's Website.
2. Extract the downloaded file, and create the firmware update file.
- How to Extract the Firmware Update File
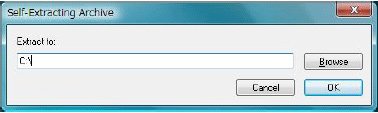
Windows
When you double-click the downloaded file, the following screen appears.
Click [OK], and the downloaded file will be extracted, and the firmware update file created.
Macintosh
The downloaded file will automatically self-extract, creating the firmware update file.
In case the downloaded file does not automatically self-extract, double-click the downloaded file.
3. Check the size of the firmware update fiIe
If the file size does not match, then download the firmware update file again
- How to Confirm the File Size
Windows
Right-click the icon of the firmware update file and select the [Properties] command from the pop-up menu that appears.
Macintosh
Select the icon of the firmware update file, and then select the [Get Info] command from the[File] menu.
4. The name and size of the firmware update file can be checked on the Website.
*** In case of using the memory card reader, follow the procedure from Step (3) onward. In case of not using the memory card reader, follow the procedure from Step (4-1) onward.
(3) Copy the firmware update file to the memory card.
1. Insert a memory card that has been formatted in the Camera into the memory card reader.
2. Copy the firmware update file to the first window that appears when the memory card is opened (the root directory).
3. Remove the memory card from the card reader.
*When removing the memory card, be sure to do so as described in the documentatIon for the computer or the card reader
*If the firmware update file is placed in subfolder of the memory card, the camera will not see it.
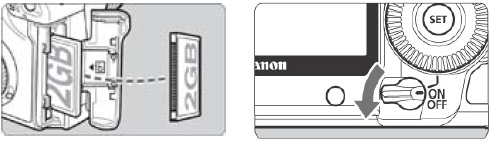
4. Rotate the Mode Dial to select <P> mode (or any mode other than Fully-Automatic Modes).
5. Insert the memory card with the firmware into the camera.
6. Turn the Power Switch 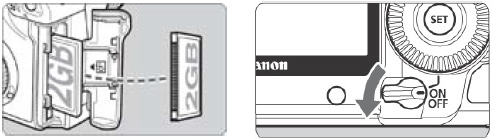
7. Rotate the Main Dial and the Quick Control Dial to select the "Firmware Ver.x.x.x" item at the bottom of the "Set-up 3 (Yellow)", and then press the 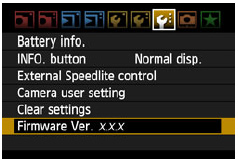
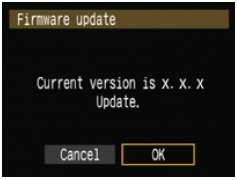
8. The firmware update screen will appear.
Turn the Quick Control Dial, select [OK], and then press the
Follow the procedure from Step (5) onward.
*If the firmware update screen does not appear on LCD monitor, the firmware update file may not have been properly copied to the memory card, so please try again starting from step (1).
Section (4-1) and later sections explain how to update the firmware using EOS Utility.
(4-1) Connect the camera and the computer.
1. Rotate the Mode Dial to select <P> mode (or any mode other than Fully-Automatic Modes).
2. Insert a memory card that has been formatted in the camera into the camera.
3. Connect the camera and the computer with the USB cable, and then set the camera’s power switch to <ON>.
(4-2) Start the firmware update.
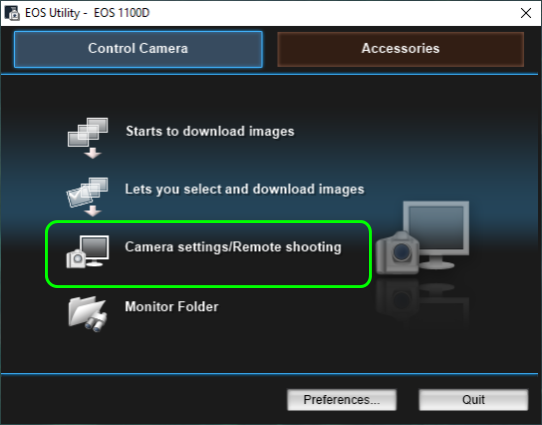
1. Start EOS Utility.
2. Click the [Camera settings I Remote shooting] button.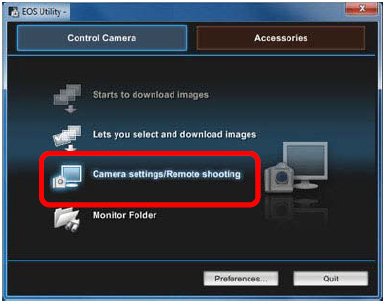
3. Click [ ], and then click the [Firmware Ver. X.X.X].
4. The firmware update screen will appear on the computer screen Click [OK].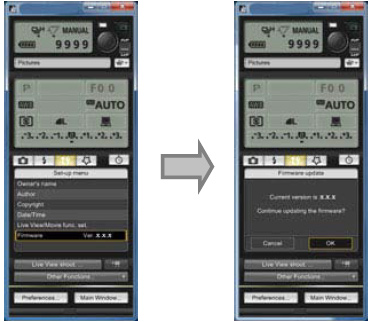
5. A window for selecting files appears, so select the firmware update file, and then click [Open].
6. A confirmation window appears, so click [OK].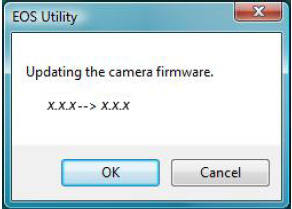
7. A window with cautionary messages about the update appears, so click [OK].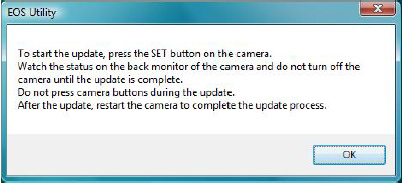
8. Follow the procedure from Step (5) onward on the camera.
(5) Update the firmware.
1. The screen will appear on the camera’s LCD monitor.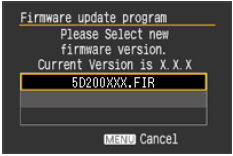
2. If you press the 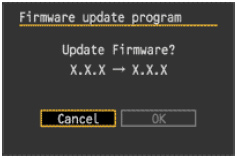
3. The message will appear during the update.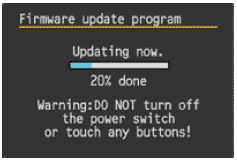
4. When the update is completed, the message will appear on the camera’s LCD monitor.
5. Complete the firmware update by pressing the 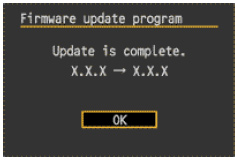
The firmware update is now completed.
When the firmware update operations are finished, turn the camera
Format the memory card before using it again.
Verifying the firmware Version
1. Turn the Power Switch <ON>, and press the menu button
2. Rotate the Main Dial and the Quick Control Dial, and you will see the “Firmware Ver.X.X.X” at the end of the settings shown in Set-up 3 (Yellow).
3. This is the currently installed firmware version number.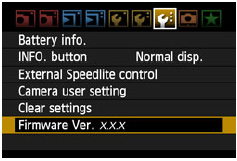
Note: Select P mode (or any mode other than Fully-Automatic Modes). The version of the firmware will not appear in the Fully-Automatic Modes.
If an ERROR message appears during the firmware update
If this screen appears, remove the battery and check to make sure that there are no problems with the battery capacity or with the firmware update file on the memory card.
If there are no problems, repeat the update operations again.
If the problem persists, please contact the Canon Customer Support Center in your region.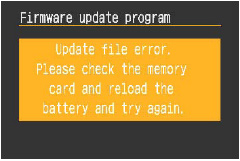
Tips
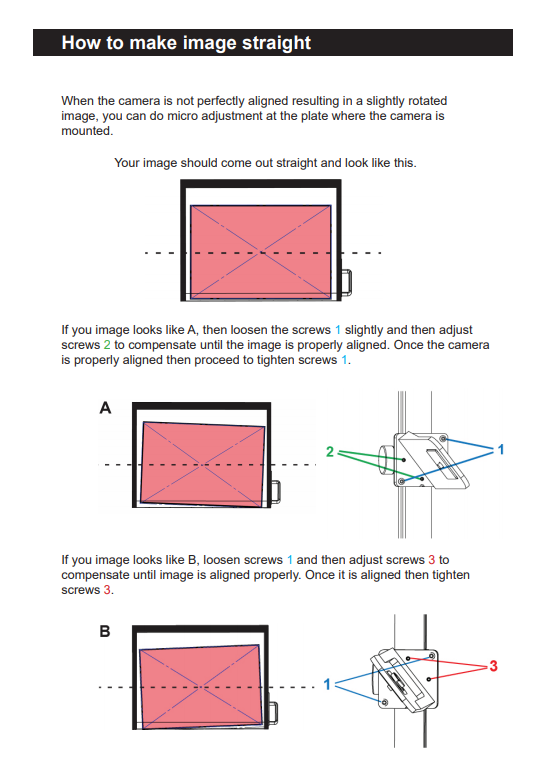
1. Set camera position (slide up or down) to closer the GUTTER (v-joint) and image rim
2. use image straight technique to align an image
3. use "RED MARK" in Bookdrive capture software to make an equal size of left and right image *we set the RED MARK of left and right image always equal
4. try to keep an image rim by
To keep focus
Fixed focus (MF) will give almost equal sharpness in the book thickness less than 2 cm. You can find how to manual focus in "How to set focus" page 16-19 in how to scan manual
1. Download the EOS utility from https://www.usa.canon.com/internet/portal/us/home/support/self-help-center/eos-utility
2. Install EOS utility in your computer
3. Connect the camera to computer via USB and turn on
4. The EOS utility will be automatic running
5. Select “Camera setting/Remote shooting”
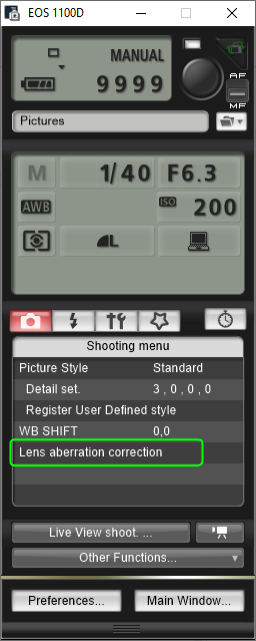
6. Click “Lens aberration correction”
7. When you select lens aberration correction EOS utility will show the window to choose the lens please choose your lens-->normally for crop frame camera e.g EOS T7i is EF-S 18-55mm f3.5-5.6 IS II and for full frame camera e.g EOS 5DSR is EF50mm f/1.4 USM check it
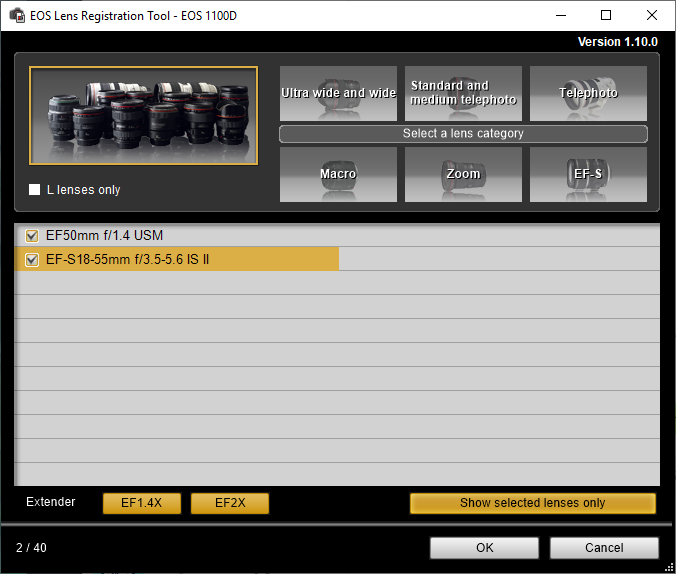
8. Click ok, the software will automatically close Now your camera have all DATA of your lens
9. At the camera, turn off and unplug the USB cable
10. Turn on the camera and press menu select “Lens aberration correction” (*the name of menu is depend on the camera model) please follow the camera manual by searching “Peripheral illumination correction”
11. Do step 3-10 again for the second camera
*note if you want to use this computer to install Bookdrive capture software please uninstall the EOS utility or Turn automatic running off
All Atiz scanners or the software from within the past 7 years come with a USB dongle (flash drive). It is a hardware lock. It is plug and play.
Old BookDrive software version before 2012 is not available to download or re-activate.
Currently, there are 4 types of dongles:
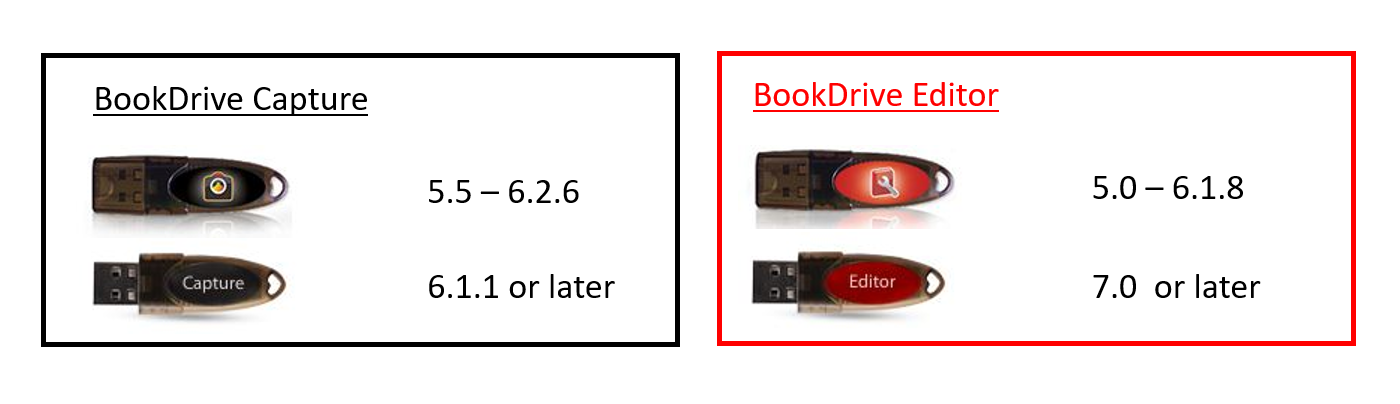
The most current software (BookDrive Capture and BookDrive Editor Pro) is available for download for Atiz customers who have purchased from within the past 12 months. Please find the links to each product on the right column.
Please register with us first before download. https://www.atiz.com/register/serial/
What about the old software?
Every old BookDrive comes with a CD that contains the software available at time of purchase. Any version of software is also available for download up to a year. Longer than that, we may no longer host it.
You can always use the dongle that you have to run the software that comes in the CD. But if you lost the CD, and you have purchased from us over a year ago, you may have to buy the upgrade from our online store.
BookDrive Capture and BookDrive Editor Pro from year 2012 onwards does not require any activation or any registration code/activation code involved.
If your software requires an activation, that means your unit is probably from older than 7 years (earlier than 2012). That version has been discontinued since 2014. Unfortunately, we no longer support it.
Old software version before 2012 is not available to download or re-activate.
The software would still continue to work as long as you maintain the computer and keep it running.
If your PC dies or you need to reinstall that version of software on another PC, we would not be able to support it. The underlying system required for activation and re-activation has been decommissioned. You will need to update to a more current version which is available from our online store (www.atiz.com/store)
First, make sure of these:
- Check your camera setting, make sure AUTO OFF is set as NO.
- Do not choose RAW+JPEG because this file saving mode is not supported.
Why does it occur?
This situation occurs when there is more than 1 program talking to the camera at the same time, which will result in an error.
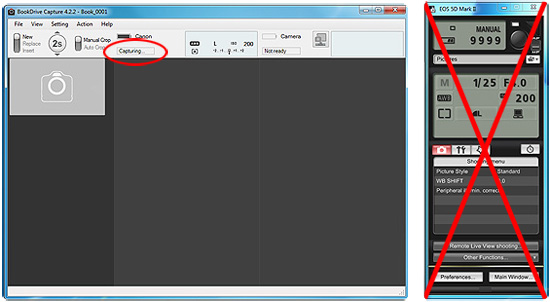
The usual suspect is the Canon EOS Utility program that is often left running unintentionally while you are running the BookDrive Capture software.

Please check status of Canon EOS Utility on the Windows taskbar. Select “Do not launch EOS Utility automatically when camera is connected.”
or else the EOS Utility will interfere with BookDrive Capture's connection with the camera.
What to do when it occurs?
If the error still occurs, please capture screenshot of BookDrive Capture error and Device Manager to us.
Plug Auto Switch before opening the computer or restart while plug Auto Switch.
No, it does not. Please choose RAW or JPEG capture(Single file only).
Atiz software works on Windows only (7 32-bit and 64-bit, Vista and XP). Mac and Linux OS are not supported. You can however use Mac hardware (e.g. Mac mini, etc.) to install Windows through Bootcamp and run Atiz software on it.
![]()
Click on this icon and use keyboard cursor "UP" or "DOWN"
![]() or
or ![]()
to change file format setting until you see "RAW". That's RAW file.
Have a question or comment? Submit it here.
We will try to respond to you within 24 hours.
ATIZ INNOVATION CO., LTD.
729/26-27 Ratchadaphisek Rd.Yannawa, Bangkok 10120 Thailand
(+66) 2683 6600
Copyright © 2023 Atiz Innovation Co., Ltd. All rights reserved.


